Literacy Environment
A well-organized and physically appealing classroom environment can serve to motivate and engage children.
Setting up Your Classroom for Independent Learning
Get tips on how to arrange your space and materials in order to promote independent learning in your classroom.
Debbie Diller states in Spaces and Places, “Classroom space impacts everything: instruction, behavior, and our sense of well-being.” Before you even begin thinking about the actual tasks you will ask children to work on during Independent Work Time, you need to consider how the structure of your physical environment will support and promote children’s independence. Think about how you use the spaces in your room to promote individual and group work and message the importance of literacy. Think about you how organize and label materials in your room so the children can access them and assist with their upkeep. Also consider how the print in your room can support children knowing what to do during Independent Work Time and how to do it.
If you have arranged your classroom to support children’s academic and social needs, and if children know what resources and materials they can use and have been taught how to access them, they will be able to self-direct their work more smoothly.
Arranging Your Space
When arranging your space for Independent Work Time, consider creating clusters of areas that allow for a balance of independent work and partner work. Create spaces for reading and writing that are quiet and private, such as a small table and chairs for writing, stations where children can work independently, and designated comfortable quiet areas. You’ll also need to create spaces that encourage cooperation and collaboration, such as large and small group areas (such as small tables around the room) for small group work and/or partner discussions. Opportunities for your children to engage in meaningful conversations which include opportunities to ask questions, share opinions, explain ideas, retell stories, etc. is crucial for children’s oral language development.
Allow enough room at stations to encourage several children to work there and provide games and activities on shelves near the carpet to allow groups of children to play together.
Use furniture as partitions to help create smaller areas. Bookshelves, tables, storage shelves, and chart stands can be used to serve this purpose. When the boundaries of each area are clearly designated, children learn how to use the space effectively. Cozy items such as pillows, bean bags, lamps and plants make these spaces appealing and welcoming. Place tall bookcases and shelves around the perimeter of the room so you and the children have a clear view of the entire room. When reflecting on your room, ask yourself, “How does the design of this space (or elements in it) promote and support children’s independence?” Prevent children from crowding in certain spaces by creating many paths into heavily used areas, repeating high interest materials in many areas of the classroom (e.g. putting writing supplies or manipulatives that are commonly used at several places in the classroom not just one).
Consider these key qualities of effective Independent Work Time spaces:
- Spaces that allow children to work alone
- Spaces that encourage collaboration
- Spaces that are organized and labeled
- Spaces that provide choices in materials and tasks
- Spaces that have anchor charts and other reference tools
Make the most out of your space. Is there something you rarely use that takes up too much space in your classroom? Think “double duty” when setting up furniture. What do you have that can serve multiple purposes? Consider these ideas for getting multiple uses out of one piece of furniture:
- Magnetic space on the sides of filing cabinets can be used for word sorting, ABC, and magnetic letter work stations.
- Small pocket charts put on the side of your desk or the back of low book shelves create a poetry or word study work station. Materials for this area can be stored in baskets.
- The back of low shelves painted with magnetic paint as primer and then chalkboard paint over the top creates a work station for magnetic letters and building words with chalk.
- Magnetic tape fixed to the back of letter or word cards can be posted on your board as part of the Word Wall or for a lesson.
- Bulletin boards placed near writing centers provide a way to display work produced at that center and give children easy access to post their work when they are finished.
- Pocket charts posted or hung low to the ground on walls allow children easy access to use them for a work station.
Arranging Your Materials
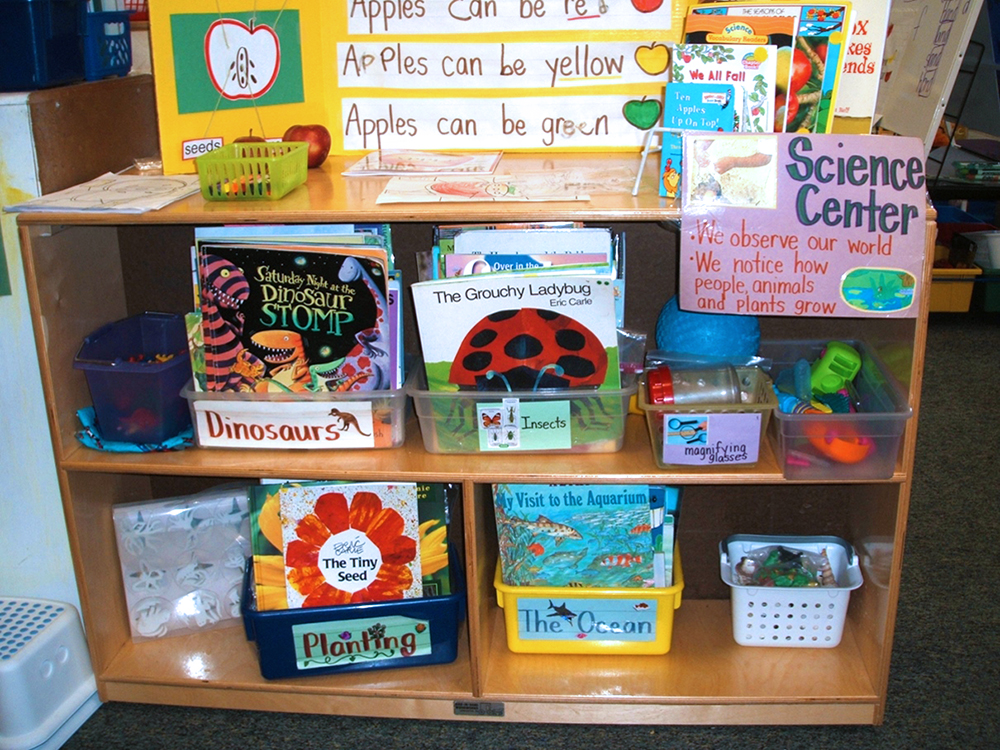
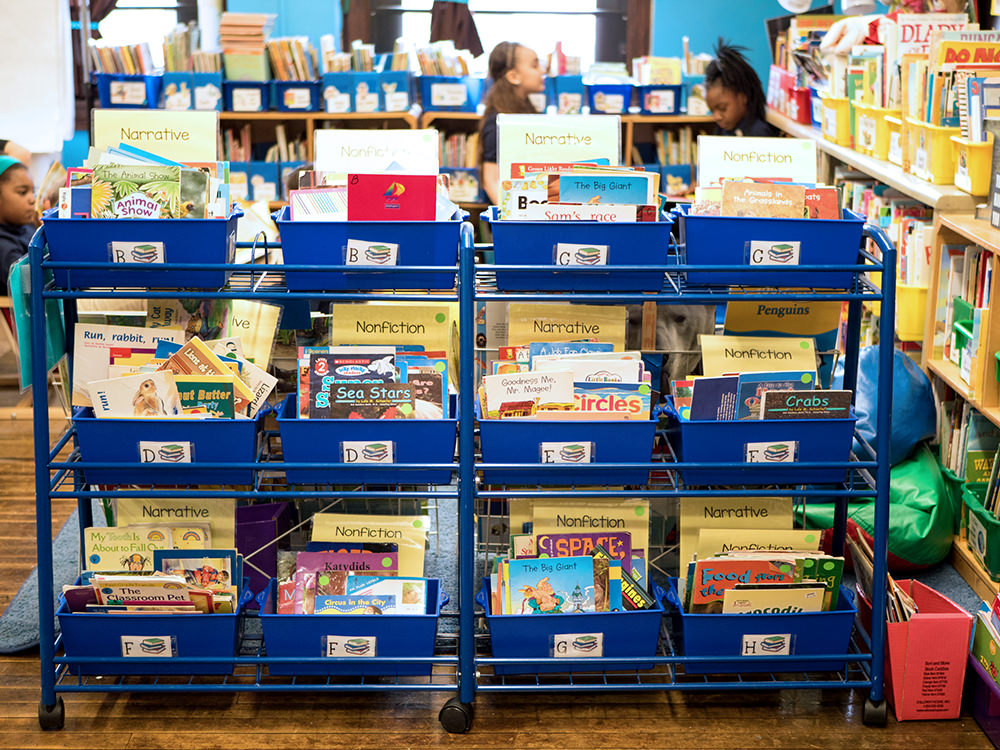
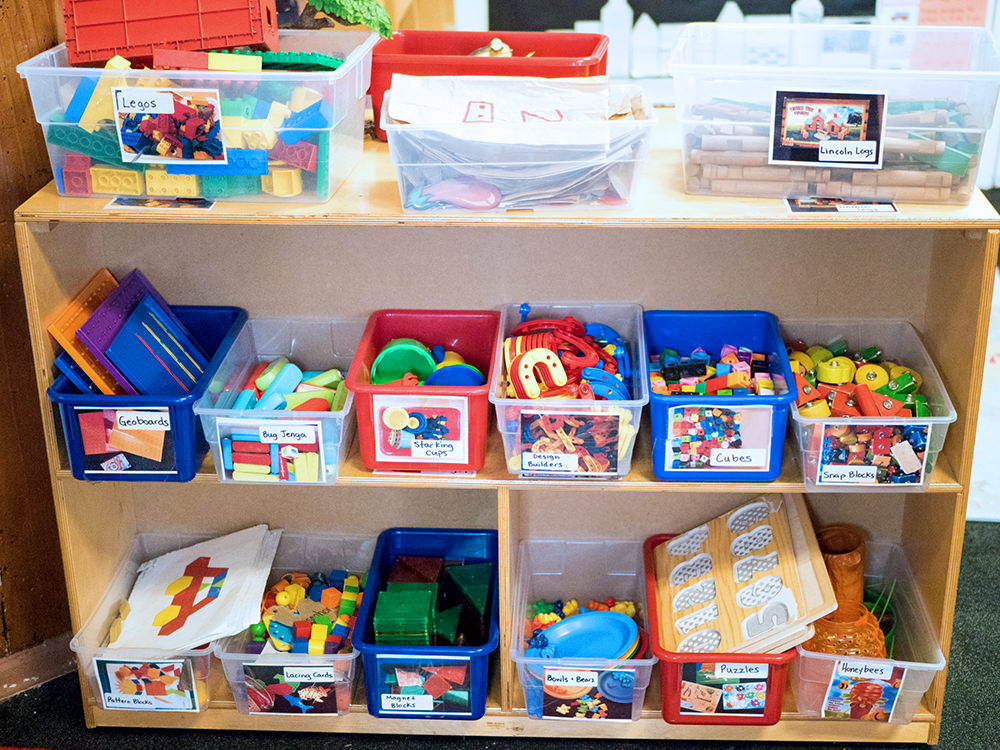
Designate space for the materials at each literacy station. Shelves, baskets, bins, and pocket charts can be used to ensure that everything needed is within reach. Provide books and other printed material. Children should have the opportunity to read and write in every part of the classroom. On the other hand, resist the urge to overload a center. Children engage in purposeful work, creating their own unique experiences, when they are not overwhelmed by clutter and can choose the materials needed to be successful. When a center is overloaded, materials tend to be considered briefly, and then end up discarded. Before new items are placed in centers, introduce and model their purpose, use, and placement.
Include materials that require children to explore literacy learning in hands-on ways. These materials should have multiple uses and may include blocks, Legos, math manipulatives, word tiles and games, drama props, art materials, science tools (magnifying glasses and magnets), and PVC pipe for reading phones. Additional tools to support English language learners include resources that mirror important vocabulary or content. All of these materials can be integrated into reading and writing tasks.
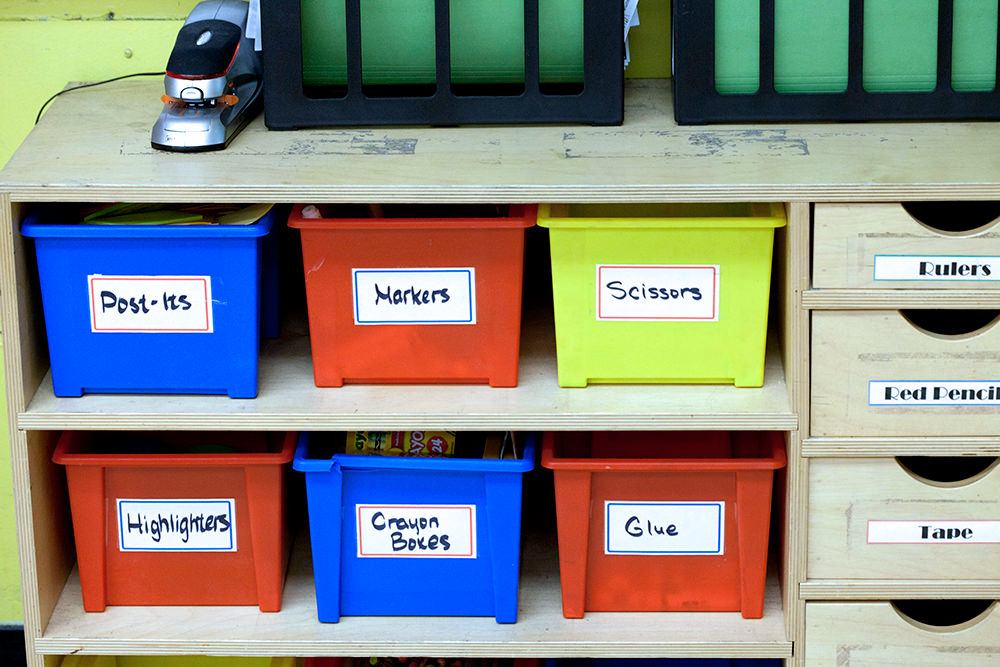
Labels
Labels are essential for helping children work independently and should appear on supplies, materials, and baskets for example. Labels should be written in your handwriting to model correct letter formation and spacing. Labels should be written on large index cards, sentence strips or card stock paper that will hold up. You may consider laminating the label if it won’t change over time. For language learners and emergent readers, add pictures or photos of the item on the label to facilitate their understanding of the printed word. Organized and labeled materials, in addition to facilitating independence, allow the children to take an active role in maintaining the classroom environment. This gives the children a sense of ownership in the classroom.
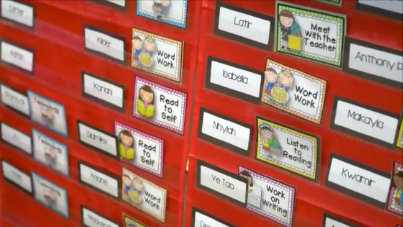
Center Management Boards
Many of us have systems to make Independent Work Time to flow properly. A center board can be a key element in our physical environment. A center management board, or work station board, is essentially a chart that records which center a child is in at any given time. Each station is generally represented with an icon. That icon is usually located at the actual station, as well.
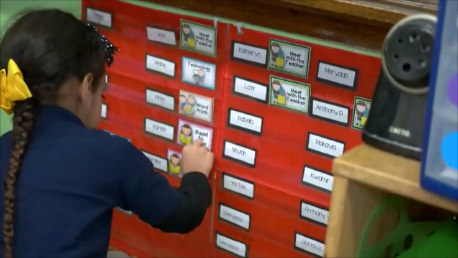
Most often, you’ll decide who goes where during station time. When you make these decisions, think about what each child needs the most practice in or what activities will help children move to the next level of learning. Use the management board to help you direct children where they need to go, matching children to the centers they would benefit most from attending. Or, use the center board to teach children how to make good decisions when self-selecting centers. Importantly, the management board you use should be easy to create and easy for children to manipulate. Effective center boards are individualized, meaning groups of children are not forced to stay together. The clips, or index cards, with the children’s names, for example, are all individual – children can choose where to go or you may support a child in a particular area by assigning them to that area multiple times. Make sure you indicate how many children can be in any one center at a time.
Remember, centers are designed in part to give you time to work with Guided Reading and other small groups. But Guided Reading should NOT be considered a center. Assign each of the children to centers (or let them choose their own) and then pull children for the Guided Reading group. If you take yourself out of the center rotation, you will find time to observe and problem solve as the children settle in to their centers. Also, if your Guided Reading group is taking a long time and the children at centers are getting noisy or restless, you can switch their centers without switching your group. This may solve some management issues and take the pressure off of you to “finish up” with your Guided Reading group. You should decide Guided Reading groups based on the needs of the children, not the number of centers open to them.
Anchor Charts
Many times our procedures are supported by anchor charts. Anchor charts are visual reminders of learning. They anchor the learning and can be used to support children as they work independently to apply and transfer concepts and language that has been taught. Print in the classroom can keep children on track. Anchor charts are one of the most effective, engaging, and child-friendly ways to support and differentiate instruction and reinforce key concepts, skills, and vocabulary. A great anchor chart can be like adding another effective educator to a classroom. Children can review the steps of a specific skill, strategy, or process during guided or independent practice using cues from an effective anchor chart (Harmon & Marzano, 2015).
- Anchor charts make thinking permanent and visible
- Provide language supports to reinforce key concepts and learning
- They focus on one key idea
- They are most effective when co-constructed with children to create ownership of the ideas and to help them remember and apply concepts, procedures, and strategies you are teaching
- The language is concise, positive, and kid-friendly – to help children access information quickly and easily
- They have visuals/pictures/labels – visuals should represent specific words and/or the big idea; this is incredibly important for pre-readers and language learners
All learners benefit from visual supports and cues. However they are essential in differentiating for the English language learner. For example, in the use of anchor charts, the visuals make it easy for child to quickly find the appropriate chart to remind them what they should be doing.
“I Can” Charts
“I Can” charts are a great tool to use to keep children engaged, communicate responsibilities, and allow for choice. These are small anchor charts that can be created for each station. They often say “I Can” at the top and then include a list of activities that children can do while at that station. Children can choose from the list or you can request that they work on specific activities first to gain practice with certain skills.
As you build “I Can” charts, keep in mind the following:
- Use clear, age appropriate language to describe the tasks
- Include a picture or icon for emergent readers and language learners
- Introduce activities before placing them on the “I Can” chart. The “I Can” chart is not a substitute for modeling and guided practice at a station.
- Place “I Can” charts in an area of the station that is at eye level, easy for the children to read
- Don’t forget to update your “I Can” charts as you change the options available at stations throughout the year
Comments
No comments have been posted yet.
Log in to post a comment.